Cookie
FlexiHub Team uses cookies to personalize your experience on our website. By continuing to use this site, you agree to our cookie policy. Click here to learn more.

All you need to know about RemoteFX USB Redirection

Olga Weis Olga Weis Last updated Dec 10, 2020

With all the distinct benefits of Microsoft RemoteFX technologies, it’s not free from shortcomings. As things stand, the most common issues are:

  • RemoteFX USB redirection is not working for some device types.
  • Enabling RemoteFX USB device redirection to a different operating system can be rather challenging (especially when it comes to RemoteFX USB redirection via Mac)

From this article, you’ll find out how you can tackle said issues by applying the proper configuration. Besides that, we’re about to show you a more straightforward and easier way to resolve the RemoteFX USB redirection issue once and for all by means of dedicated USB port redirector. Just install the app, attach the USB device, and you're all set to go.

Software method for RemoteFX USB Redirection

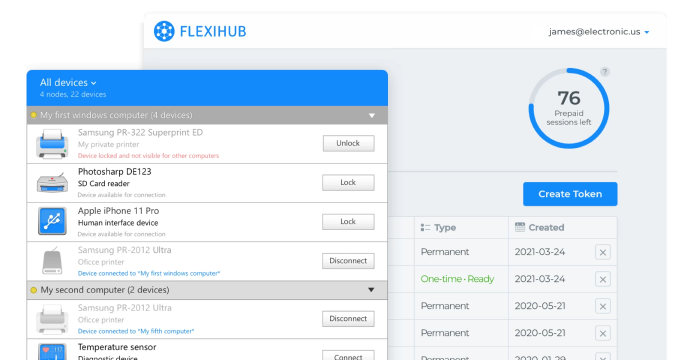
FlexiHub by Electronic Team, Inc is a top-level software solution purposely designed to grant you never-failing remote control of all the USB peripherals plugged into any machine in your network. Alongside this, you can try this handy tool to set up RemoteFX USB redirection to a remote desktop, so you can use your peripherals to the fullest extent.

FlexiHub

Windows, macOS, Linux, Android
4.8 Rank based on 386+ Reviews
FlexiHub is a great tool to redirect USB in RDP with minimal configuration. In just a few steps, you can start redirecting USB traffic in RDP sessions.
FlexiHub

Using FlexiHub for Microsoft RemoteFX USB redirection

blank
1
Create your account on the official FlexiHub website and log into your personal user cabinet. Choose the subscription plan you like to start a free 30-day demo period (can be canceled anytime).
 Register Flexihub account
2
The next step towards enabling Microsoft RemoteFX USB redirection is to download the right app version for your OS and install it on your host PC, then repeat for all your machines.
 Download RemoteFX USB redirection app
3
Run the app on your host and log into your FlexiHub account to see the list of peripherals you can share from it.
 Log in for start RemoteFX USB redirection
4
Click the Share button next to the devices you’d like to use during your VM session.
 USB redirection to Remotefx
5
Now, repeat step 3 on your virtual machine, find the devices you’ve just shared on the list, and click Connect.
 Connect USB devices in Remotefx
7
That’s all. From that moment on, you’ll see the shared USB device in your guest system as if it was attached to it directly.
Enable RemoteFX USB redirection with Flexihub!
30-day demo period

Here are some of the many benefits of using FlexiHub:

  • Multi-platform: works for any popular OS, be it Windows, Linux, macOS, or Android.
  • No quantitative limits: redirect all the USB devices you might need during your RDP session
  • Cross-platform sharing: any of your machines can be a server for enabling RemoteFX USB redirection on the clients, in every OS combination possible.
  • Strong data protection: with the 2048-bit SSL encryption protocol for your local area data transport and its own server, it's basically zero risks of security leakage.
  • No extra driver installation: as long as your server has all the relevant drivers, you won’t have to trouble yourself with installing them on any of your client PCs.
  • Straightforward setup process: you’ll instantly see devices redirected from the host system just as they were directly attached to the PC.
Device Isolation for Multi-User Systems
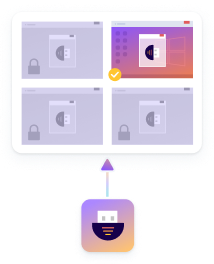
Grant exclusive access to your USB and COM devices and run FlexiHub privately within one specific user session.
isolationFeatureImage

What is RemoteFX USB redirection?

RemoteFX USB redirection for Remote Desktop Protocol (RDP) is a specialized feature you can use to access and operate USB peripherals from within a remote session in cases where the standard USB redirection to RDP comes up short. Serves as a supplement to other high-level redirections, s.a. Easy Print, Port Redirection, Plug-and-Play Device Redirection, etc.

The similarities and differences between RemoteFX USB Redirection and RDP High-Level Device Redirection:


RemoteFX USB Redirection RDP High-Level Device Redirection
No device driver installations on any client Device drivers must be installed on every client
Device drivers must be installed on the server No device driver installations on the server (most typically)
One redirection method for almost every device type Dedicated redirection method for each device type
Uses RDP connection to forward URBs in both directions Uses an optimized protocol for each device type for high-level device functionality
Single session: a device can be accessed from only one machine at a time Multiple sessions: a device can be accessed simultaneously from several machines, i.a. the host
Works better with LAN Works equally well with both LAN and WAN

Requirements to enable RemoteFX USB redirection

So here’s what you need to enable RemoteFX USB redirection: Server 2012 R2, 2012 or 2016 plus the Desktop Experience feature for the host, and Windows Workspot 2.x.x (or any other RemoteFX-capable one) for your clients.

How to enable RemoteFX USB redirection for Windows 10

Start with configuring your server:

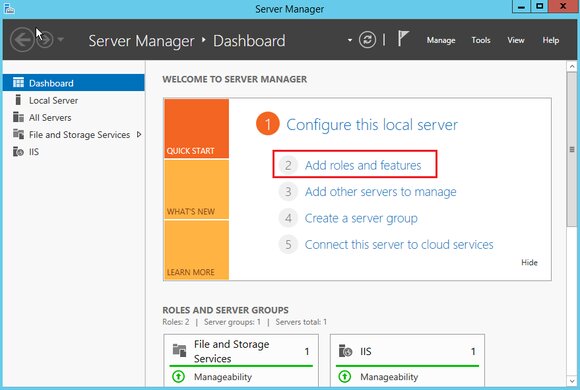
Step 1: Open your system’s Server Manager and click Add roles and features to invoke the pop-up window titled Add Roles and Features Wizard. Add Roles and Features Wizard

Step 2: Click Next to see the Select installation type page. You won’t have to make any adjustments here for the default configuration is just right.

Step 3: Click Next again to get to the Select server roles page and pick Remote Desktop Services on the Roles list.

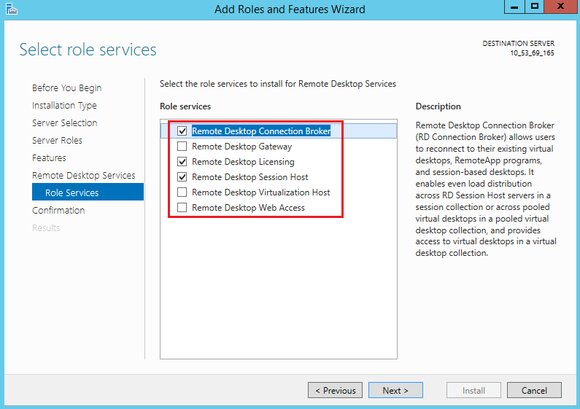
Step 4: Keep clicking Next until you see the Role services list. Here you need to tick Remote Desktop Connection Broker, Remote Desktop Licensing, and Remote Desktop Session Host. Add Roles and Features Wizard

Step 5: Click Next one more time, then click the Install button.

Step 6: Wait until the installation is successfully completed, restart your CVM. Then use Windows search to find gpedit.msc. Press Enter to invoke the window titled Local Group Policy Editor.

Step 7: Go to Computer Configuration → Administrative Templates → Windows Components → Remote Desktop Services → Remote Desktop Session Host → Device and Resource Redirection and double-click Do not allow supported Plug and Play device redirection to invoke a pop-up window.

Step 8: On the Do not allow supported Plug and Play device redirection window, select Disabled and click OK.

Step 9: Restart the CVM once more.

Now configure your client:

Step 1: Enter gpedit.msc to Run dialog box and click OK.

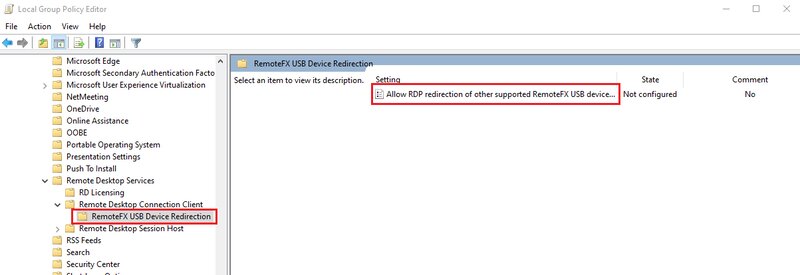
Step 2: In the invoked Local Group Policy Editor window, click RemoteFx USB Redirection on the menu (it’s in Computer Configuration → Administrative Templates → Windows Components → Remote Desktop Services → Remote Desktop Connection Client → RemoteFx USB Redirection), then double-click Allow RDP redirection of other supported RemoteFx USB devices. Allow RDP redirection of other supported RemoteFx USB devices

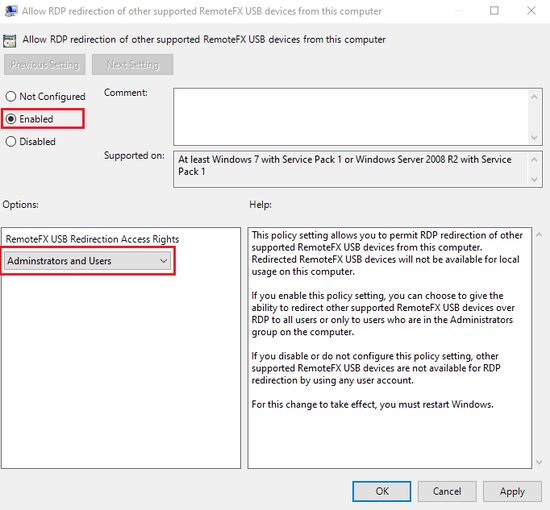
Step 3: In the popped-up window, select Enabled, then go down to the RemoteFX USB Redirection Access Rights menu and select the Administrators and Users option. Administrators and Users option

Step 4: Click OK and restart your computer.

Making USB devices available through RemoteFX USB redirection

As a last resort, you can try using another method of enabling RemoteFX USB redirection to Remote Desktop: force redirection of a specific device type by making direct changes to the registry.

IMPORTANT! Before you modify the registry, please, don’t forget to make a back-up copy.

Preparatory steps:

  • Make sure your client machine has no USB storage devices attached.
  • Use Group Policy to forbid USB storage device installation for that client.
  • Check here to identify the interface class GUID for your USB device.

Method 1:

  • Find this registry key on your client system: HKEY_LOCAL_MACHINE\SOFTWARE\Policies\Microsoft\Windows NT\Terminal Services\Client\UsbSelectDeviceByInterfaces
  • Type: REG_SZ Name: NNN Data: {xxxxxxxx-xxxx-xxxx-xxxx-xxxxxxxxxxxx} Where NNN - any unique name for the device, and xxx is the interface class GUID number.

Method 2:

  • Use Administrator command prompt to run this: reg add "HKEY_LOCAL_MACHINE\SOFTWARE\Policies\Microsoft\Windows NT\Terminal Services\Client\UsbSelectDeviceByInterfaces" /v 100 /t REG_SZ /d {53f56308-b6bf-11d0-94f2-00a0c91efb8b} /f

Whatever method you opt for, changes will take effect only when you restart Remote Desktop Connection.

FlexiHub

Requirements: Windows, macOS, Linux, Android and Raspberry Pi.
Size: 10.45MB
Version: 6.1.15025 (19 Feb, 2024)
User rating: (4.8 based on 386+ reviews)