Cookie
FlexiHub Team uses cookies to personalize your experience on our website. By continuing to use this site, you agree to our cookie policy. Click here to learn more.
Olga Weis Olga Weis Last updated Jul 24, 2024

How to share a printer? A comprehensive printer sharing guide

If you are using a printer at home or in your office and looking for a way to get the much desired ability to access your peripheral from a remote computer, then you've come to the right place. In this guide, I’ll highlight the simplest ways to share your printer for remote access. The good news for Windows users: you can do this with the help of the built-in HomeGroup feature working across LAN.

The even better news: if you’d like to go further than your local network and share a printer over the Internet, there are efficient software apps that can help you easily achieve this. Plus, the dedicated programs will let you share printers (including barcode label printers) from not only Windows but also Mac, Linux, and Android. Read on to learn more:

How to share a USB printer over the network in Windows 10 and 11

The Windows 10 and Windows 11 operating systems allow you to share a printer with other network-connected computers. Sharing a printer requires you have a physical connection to the device from a primary PC using a cable or wireless connectivity. Then, you need to configure sharing settings for the printer so it can be accessed by other computers. The device needs to be shared from the primary printer before other PCs can use it.

After configuration is complete, turn on the printer and ensure the primary computer is connected to the network. If the primary computer or the printer is powered down, the printer will not be accessible to other machines.

To add the shared printer to a secondary PC, you need to know the device’s network path. The network path contains the primary computer’s IP address or network name and the printer’s share name.

Here is a quick guide on how to share a printer:

  1. Before proceeding to share a USB printer on the network, make sure said printer is hooked up to a computer, connected to a power supply, and turned on.

  2. Open the Devices and Printers tab. To do that, click on the Start icon, and go to Settings→Devices→Devices and Printers.

  3. In the invoked tab, find the printer you want to share, right-click on its name, and pick Printer properties from the pop-up menu. printer properties
  4. Go to the Sharing tab and tick the box Share this printer. share this printer

Note: If you plan to share a USB printer with both Windows 32-bit and Windows 64-bit machines, be sure to tick the box Render print jobs on client computers to avoid problems with installing the printer on a client-side.


render print jobs on client computers

Share USB printer over network
30-day demo period

How to access a shared USB printer over the network in Windows 10

Now that you know how to share a USB printer between two computers (or more, as required), it’s time to learn how to access the said printer from a remote machine. There are two different ways to do that and you're the one who has to decide which one you like more.

Method 1:

  1. Open the Devices and Printer tab, then click Add Printer.

  2. In the invoked window, click the lint that says The printer that I want isn’t listed.

  3. You’ll see the next tab with the list called Find a printer by other options. On this list, you need to choose the Select a shared printer by name option.

  4. Click the Browse button and find the printer you want to access. printer you want to access
  5. On the invoked dialog window, click the Install driver button. Then click Next. install driver

Once the installation is completed, you'll be able to see the shared printer on the remote machine’s Devices and Printers tab.

Method 2:

  1. Launch the File Explorer.

  2. Go to the Network folder.

  3. Right-click on the computer you’ve shared the printer from, and pick Connect from the drop-down menu. connection

The best part about having your printer shared through Windows 10 network is providing access to the printer for all machines in your network at a time. This means, you can avoid emailing your files to a PC connected to the printer directly.
Also, it’s worth noting that there are specifically developed software applications for those who need to share a printer over the Internet.

Share USB printer over network
30-day demo period

How to enable printer sharing on Windows 11

A prerequisite for setting up a shared printer on Windows 11 is to enable file and printer sharing from the Network and Sharing Center using the following steps.
  • 1.
    Open the Start menu and type control panel or cpl.
  • 2.
    Select Control Panel from the Best Match result.
    Open Control Panel
  • 3.
    Ensure the View by option is set to Category.
  • 4.
    Click the View network status and tasks link.
    Network and internet win11
  • 5.
    Click the Change advanced sharing settings link.
    Change advanced sharing setting
  • 6.
    Expand the Network discovery section and verify that Turn on Network discovery and Turn on file and printer sharing are both enabled.
    Network discovery ON

How to Share a Printer in Windows 11 From Settings

One method of sharing a printer from Windows 11 is by modifying its settings to make the printer accessible to other computers. Use the following steps.
  • 1.
    Open Settings by clicking Start, using the Windows key or the keyboard shortcut Windows key + I.
  • 2.
    In Settings, click on Bluetooth & devices and choose the Printers & scanners option.
    Printers & scanners option
  • 3.
    Click on the printer you want to share.
  • 4.
    Click on the Printer properties option on the following screen.
  • 5.
    In the Printer Properties window, click the Sharing tab. Check the Share this printer box and give the printer a name that will be used when sharing it with other users. Click Apply and OK when finished.

How to Share a Printer via Control Panel on Windows 11

You can also use the Windows 11 Control Panel to share a printer with the following steps.
  • 1.
    Click Start or the Windows key and type cpl. Open Control Panel.
  • 2.
    In Control Panel, verify that View by is set to Category.
  • 3.
    Click the View devices and printers link.
    View devices and printers settings
  • 4.
    Right-click the printer you will be sharing and choose Printer properties from the drop-down menu.
    Printer properties from the drop-down menu
  • 5.
    Select the Sharing tab at the top of the window and check the Share this printer box. Give the printer a share name. Click Apply and OK to share the printer.
    check the Share this printer box
  • 6.
    Once the printer is shared, it can be accessed by other network-connected PCs.
  • 7.
    Open File Explorer and select the Network folder.
  • 8.
    Right-click the shared printer and select Connect to establish the connection.
    Connect to a shared printer

Sharing printer over the Internet with the software

As I’ve already mentioned, the standard Windows options allow you to connect your printer to network only within a local area. So, I’ll start the write-up with more versatile solutions like FlexiHub and USB Network Gate. These third-party tools work across any distance and make it possible to redirect printers over the Internet.

FlexiHub

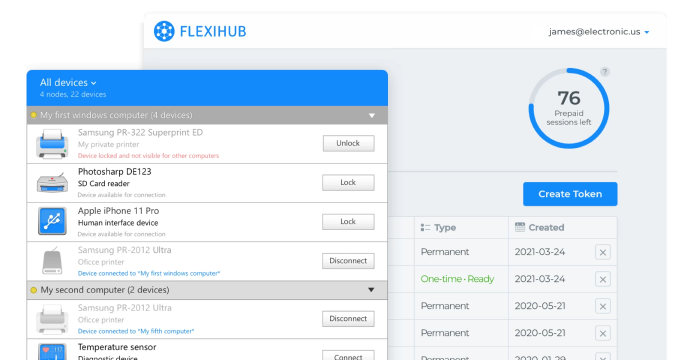
If you don’t know which solution to choose to share a USB device over network, you may use an efficient printer sharing software - FlexiHub. It allows access and helps to share a printer on Windows, macOS, Linux, and Android platforms.

FlexiHub
4.8 Rank based on 386+ Reviews
FlexiHub

How to share printer over the Internet

  • 1.
    Register a free FlexiHub account here or directly in the app later.
    Register a free FlexiHub account
  • 2.
    Start a FlexiHub trial by choosing the number of connections.
    Start a FlexiHub demo
  • 3.
    Install and open the software on both machines participating in the connection. To log in enter your registration e-mail and password.
    Install and open the software
  • 4.
    In the FlexiHub interface find the printer you are going to connect to and click the "Connect" button.
    Find the printer you are going to connect
  • 5.
    That’s it! You may manage the printer like it is plugged to your computer directly!
    printer sharing last step
  • 6.
    Your printer will be redirected to the machine, and you can use it as if it were connected physically to the computer. blank
USB printer sharing
30-day demo period

icon pros Pros.

  • The app works via wireless network;
  • All connections are protected with advanced encryption;
  • The app enables you to share any USB and Serial devices – scanners, web cameras, projectors, mobile phones, etc.

icon cons Cons.

  • Free version doesn't allow to access remote devices;
  • The software has to be installed on all of your machines which will connect to the remote printer.

USB Network Gate

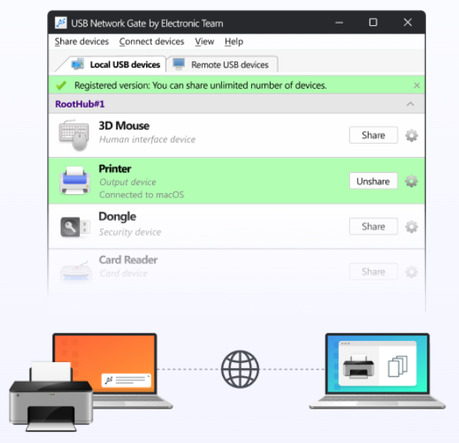
USB Network Gate is specifically designed to provide remote access to USB devices, and will certainly help with sharing a printer over network in a couple of clicks

USB Network Gate
4.9 Rank based on 372+ Reviews
UNG

Few easy steps:

  1. Download and install USB Network Gate. Install it on other computers as well.

  2. Once you install it, the printer to be shared will be displayed in the Devices window. If you need to change the port, add encryption into the connection or encipher data transfer – press the gearwheel icon next to Share. Once the setup is complete, click Share. Now the printer can be seen on all machines with USB Network Gate.

icon pros Pros.

  • 14-days trial version has a complete functionality;
  • App is available for Mac and Linux also;
  • Licensing works as standard software – you will only have to pay once;
  • Unlike FlexiHub, it is capable to share printers over LAN as well.

icon cons Cons.

  • Once the trial period is over you will need to buy a license for $159.95;
  • The app has to be installed on every computer that needs access to the printer.

How to Use a VPN to Access Remote Network Printers

Virtual private networks (VPNs) can be used to access networked or shared printers connected to a remote network. The VPN enables you to create a secure tunnel to a VPN server on the remote network. This tunnel is used for all data transfer and gives your computer the appearance of being on the remote network. This makes shared printers and other resources such as Windows file shares accessible to your machine.

After connecting to the VPN you will get the same functionality when accessing the printer as if you were on its local network. VPNs are a popular business solution for enabling remote employees to connect to company networks and resources.

While a VPN is a viable solution for accessing remote printers, you may find FlexiHub meets your requirements. Windows provides some support for creating a VPN server, but FlexiHub eliminates some security concerns associated with hosting a VPN server.

Wireless Printer

One of the most useful capabilities you may find in a modern printer is the built in networking. More and more current-day printers come with support for Wi-Fi, Ethernet or both. This is very convenient, as you don’t need to have your PC turned on to be able to access the printer. Now, you can connect to the printer directly over the network.

There’s no a general instruction on how to configure the networking option on your printer, as the set up depends on the type of the printer you have. But if you are sure that your device supports this feature just check the manual that came with your printer or the manufacturer’s website for information.

Frequently Asked Questions about USB printer sharing

  1. Register For The FlexiHub Free Demo

  2. Select The Number Of Connections

  3. Install And Run FlexiHub On Both Computers (Login Using Registration Email/Password)

  4. Locate Your Printer And Hit “Connect
  1. Make Sure Both Computers Are Ethernet-Compatible (If Not, An External Adapter Is Required)

  2. Connect Both Computers Together With Your Ethernet Cable

  3. Go To: “Network & Internet” > “Change Advanced Sharing Settings” > “Turn On File And Printer Sharing” > “Save Changes

  4. Open The File Explorer On The Second Computer And Locate The System Sharing The Printer You Want To Access
  1. Connect Your Printer To One Computer Using An A/B USB Cable

  2. After Installing The Printer Drivers (Software) Navigate As Follows: “Start Menu” > ”Control Panel” > ”Hardware And Sound” > ”Devices And Printers

  3. Locate Your Printer, Right-Click And Select “Printer Properties

  4. Click The “Sharing” Tab And Check The Box Beside “Share This Printer

  5. Go To: “Control Panel” > “Network And Internet” > “HomeGroup” And Create A HomeGroup (Write Down The Provided Password, You’ll Need It Later)

  6. On The Second Computer, Go To: “Control Panel” > “Network And Internet” > “HomeGroup” > “Join Now” And Follow Instructions

  7. Go To “Devices And Printers” > ”Add A Printer” > ”Select A Shared Printer By Name” > ”The Printer I Want Isn’t Listed

  8. Double-Click Your Shared Printer Then Hit “Next” And Follow The Instruction To Complete
How to share printer
  • 4.8 overall rank based on 386+ Reviews
  • Requirements: Windows, macOS, Linux, Android and Raspberry Pi.
  • 10.76MB Size.
  • Version 7.0.15125. (3 Jun, 2024).
  • Pricing starts $14 per month billed annually