Cookie
FlexiHub Team uses cookies to personalize your experience on our website. By continuing to use this site, you agree to our cookie policy. Click here to learn more.

How to Share USB Hard Drives on a Network: The Definitive Guide

Olga Weis Olga Weis Last updated Aug 27, 2021

It can be quite challenging to connect external hard drives remotely. Especially when it is needed to access the files from several computers on the network. That is when it calls for you to share an external drive - either with the Windows built-in tools or with the help of advanced USB over Network software for USB drive sharing.

So the question is how to share external hard drives on a network? Read on to find the best way to share an external hard drive over a network.

Contents

Share external hard drive over network - software method


FlexiHub

Windows, macOS, Linux, Android
4.8 Rank based on 386+ Reviews
Electronic Team, Inc. offers a simple software solution to the problem of sharing a USB drive over a network - FlexiHub.
FlexiHub

How to share hard drive over network

1
Sign up for a free FlexiHub account here and start a free demo period that allows you to share USB devices over Ethernet.
2
Download and install the software on all of the computers that will be remotely accessing the shared drive.
3
Launch FlexiHub, sign in using your newly created login credentials and share the external hard drive.
4
Locate the shared drive on the remote computers using FlexiHub and connect to it. Use the remote USB drive as if it were attached to your machine.

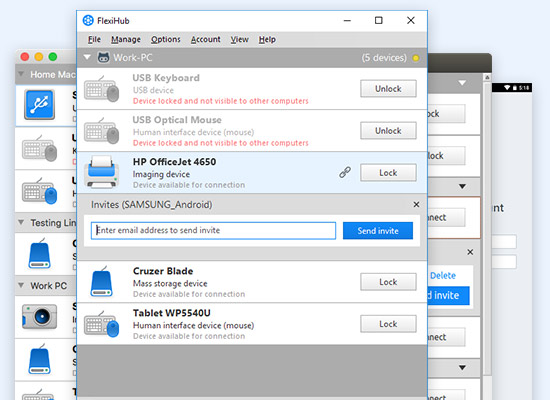
That’s it! You now have all the functionality that you would have with a direct connection to the USB device.

Check out the video guide with the detailed steps on how to share hard drive over the network

Why is it the most versatile way of sharing hard drives over the network


  • Connect remote USB drives even if they are located in different networks;
  • Ideal for virtual machines and remote desktop connections;
  • Works with other USB devices as well;
  • Share USB drives on Windows, Mac, Linux and Android;
  • No additional hardware required.

How to connect an external hard drive to WiFi router


A variety of routers nowadays have a USB port that can be used for connecting USB drives to share with other machines on your network. Once you’ve located the USB port on your router, go ahead and attach your USB external hard drive. Then, you can share an external hard drive by mapping it as a network drive over a WiFi network.

Step-by-step instructions to connect hard drive to the router:


  1. You first need to find it in the router’s settings. Use a web browser on the WiFi network and type in the IP address of the router. Often it is 192.168.1.1. Share USB hard drive

  2. Log in to the router interface and navigate to Settings. Open the ‘Drive storage’ tab. Right-Click on the desired drive and select the ‘Map network drive’ menu option.
  3. It’s advisable to give your drive a meaningful name for reference and then check the ‘Reconnect at sign-in’ option.
  4. Click ‘Finish’ when the setup is complete. Your computer may need to be restarted to see the USB drive.

Pros: There are no additional hardware components or cables required to implement this method of sharing a hard drive over a network.

Cons: It is limited, however, by the range of the WiFi signal so will not provide remote access over great distances.

How to share a network drive in Windows 10


There are many situations where it’s helpful to share a drive on Windows 10 computers. You might want to share a collection of images, videos, or music files with your friends and colleagues. Many times, a large external hard drive that is physically attached to a computer requires access by other network-connected machines.

USB hard drive over the network

Here are the steps to follow if you want to share a hard drive over the network with Windows 10 systems. The Windows account sharing the device is required to be an admin account. One issue that needs to be addressed before you start is to password protect the drive that you intend to share. When connecting the drive over the network you will be prompted to enter a password and a blank is not acceptable. Your best strategy is to secure your drive with a password.

On the computer attached to the drive:

  1. Share the drive with Windows Advanced Sharing by right-clicking on the drive and selecting Give access to -> Advanced Sharing
  2. Enter the name you will use to identify the drive to network users.
  3. Choose Permissions and check to Allow Full Control if you want to read and write to the drive from remote computers.

On the remote machine that will access the shared drive:

  1. Select the Map network drive.
  2. Choose the drive letter you want to give the shared drive and enter the IP address of the sharing computer and drive name you defined earlier in this format: \\IP_address\drive_name.
  3. Select the Reconnect at sign-in and Connect using different credentials options.
  4. You will be prompted for login credentials from the computer sharing the drive in the format IP_address\username where the IP address is the same used above and the username is the login on the sharing computer.

Add an exception to Windows Internet options to eliminate warning messages when moving data.

  1. Go to the Control Panel and Internet Options
  2. Navigate to the Security tab and choose Sites.
  3. Select Advanced and Add with the IP address used to map the drive.

Share storage through a high-speed USB cable


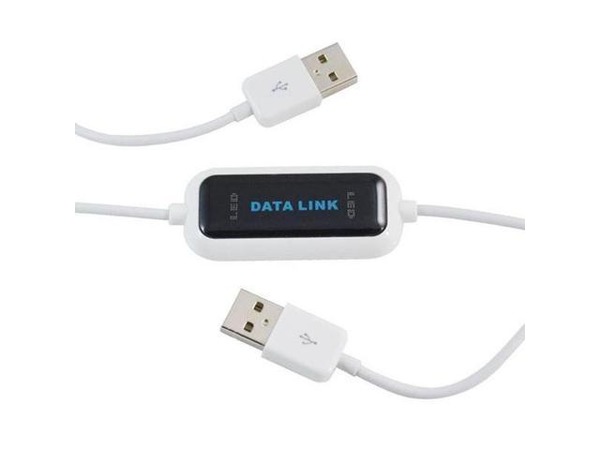
We will also show you how to use a high-speed USB cable to share storage between computers. The solution is compliant with both USB 1.1 and 2.0. specifications. USB 2.0 is a good solution for sharing USB drives. You are, however, limited by the length of the cable which does not make this a viable solution for sharing devices with remote users.

sharing external hard drives

The USB 2.0 protocol enables you to:


  • Use a USB port to implement communication between two computers.
  • Transfer data in both directions using a dual buffer at speeds over 15 Mbps.
  • Use a single-chip ASIC Hi-Speed USB host to provide bus-powered communication from a USB port.
  • Work in both Mobile PC and SOHO environments.

Frequently Asked Questions related to hard drives

An external drive is essentially the same as an internal drive, except it is not located inside the computer. It can be a solid-state drive (SSD) or a hard drive (HDD) that is connected to the machine with an external cable or interface.
External drives can be bus-powered, meaning they receive their power through the connection to the computer. They can also be self-powered and then need to be connected to an electrical outlet to be used.
External hard drives are useful in several situations. One is to address capacity issues on a personal computer that may be impacting its performance. If your system is running slow or crashing you may want to move some files to an external drive to provide more storage space and virtual memory to your machine.

An external drive can also be employed to furnish additional storage capacity to a network of users. They may be accessing the device simultaneously as in the case of a drive connected to a company file server.

FlexiHub

Requirements: Windows, macOS, Linux, Android and Raspberry Pi.
Size: 10.45MB
Version: 6.1.15025 (19 Feb, 2024)
User rating: (4.8 based on 386+ reviews)