Cookie
FlexiHub Team uses cookies to personalize your experience on our website. By continuing to use this site, you agree to our cookie policy. Click here to learn more.

Parallels USB passthrough guide

Olga Weis Olga Weis Last updated Jul 13, 2021

Parallels Desktop support for USB connections

Having started your virtual machine, you might be wondering how to make local USB devices accessible to the guest operating system.

usb connect parallels desktop

It’s really not that hard, you only need to follow these simple steps:

Scenario 1. Your Parallels Desktop is already in operation:

  • Insert the USB device into your Mac;
  • Choose the required guest OS in the window that will appear.

Scenario 2. Your guest OS isn’t running yet.

  • Connect the USB device to your Mac;
  • Start the Parallels virtual machine;
  • In the Mac menu, choose Devices, then USB & Bluetooth, and "the desired device’s name".

Note: Once done, you can check if the device has been connected to the virtual machine. If you reopen the menu, a tick next to the device’s name will indicate a successful connection to the guest system.

Here you go! A few simple steps let you get full access to the locally attached device from the Windows guest system.

But now let’s imagine that you want to share a USB peripheral with a virtual machine that is running on a remote Mac. It’s no secret that the Parallels app does not offer a way to forward devices to remote computers. So what’s the solution?

Connect local peripherals to a remote Parallels VM

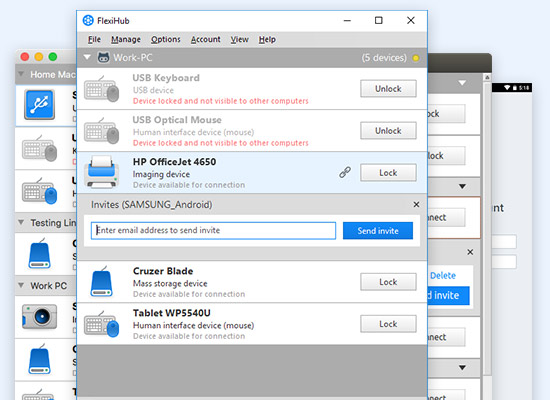
Luckily, there’s an easy way to access USB (and COM port) devices remotely. FlexiHub is a software application that makes this possible.

FlexiHub not only helps you create a Parallels remote desktop USB connection but also comes to the rescue if a USB device is not recognized by a Parallels virtual machine.

The software is powered by advanced port redirection technology. It allows you to forward USB devices to any remote (real or virtual) machine over the Internet.

FlexiHub is perfectly compatible with macOS, Windows, Linux, and Android. You can use it to connect from Windows to macOS, from macOS to Linux, and in any other combination.

Parallels USB passthrough software

FlexiHub is a complete solution to the problem of accessing USB peripherals in Parallels Desktop.

FlexiHub

Windows, macOS, Linux, Android
4.8 Rank based on 386+ Reviews

How to use Parallels Desktop and FlexiHub for connecting to remote USB peripherals

blank
1
You register an account on the FlexiHub website.
 register flexihub account
2
Download the app and install it on your local Mac. (Make sure the computer has Internet access).
 sign up flexihub demo
3
Plug the USB device that needs to be shared into the Mac machine.
 download flexihub
4
Launch FlexiHub and log in to your account.

Now the locally attached device is automatically shared over the Internet and is available for remote access.
 login flexihub
5
Install the software on the Parallels Desktop virtual machine from which you want to connect to the device.
6
Start FlexiHub and log in to the same account. In the app’s interface, you will see a list of devices that you can use remotely. Find the one you need and click “Connect” next to its name.
 Start FlexiHub

FlexiHub

Windows, macOS, Linux, Android
4.8 Rank based on 386+ Reviews
FlexiHub is a dedicated communication utility that allows you to implement Parallels USB passthrough capabilities in your virtual sessions.
FlexiHub

That’s it! The USB peripheral will immediately appear in the Device Manager of your guest OS no matter its actual location.

The great thing about FlexiHub is that it works with USB devices of virtually any type, including 3D mice, USB card readers, webcams, etc. If a device is not natively detected by Parallels, you can still connect it to the VM with the help of this dedicated third-party tool.

Being one of the most popular USB redirection solutions out there, FlexiHub is known for its outstanding feature set:

  • Traffic encryption for secure connections to remote devices;
  • Live chat that makes it simple to communicate with the users you share your devices with;
  • Streamlined and intuitive user interface;
  • The ability to share devices while in an RDP session;
  • Fully support for VMware, Citrix XenDesktop, VirtualBox, and Hyper-V solutions.
  • And many more.

Is Parallels Desktop compatible with Apple M1 сhip?

To the delight of the virtualization software enthusiasts, the newest Parallels Desktop version works incredibly well on M1 chip-powered Macs. The latest release has given the exciting possibility to use Parallels Desktop for Windows 10 installation on M1 Mac computers.

parallels desktop M1

However, it should be noted that only the ARM processor version, known as “Windows 10 on ARM Insider Preview”, can be utilized within this scenario. That edition becomes available for download at the Windows Insider Preview Downloads web page after you register in the free Windows Insider Program.

FAQ

In simple terms, Parallels Desktop is a highly productive virtualization solution that gives you a way to run Windows apps on a Mac. By using this tool, you can take advantage of both Windows and macOS at the same time.

Parallels Desktop provides means for fast access to Windows apps on a Mac without having to restart the computer. It offers a chance to launch Windows programs from Finder and drag and drop files you need to work with.
You will have no problem sharing devices attached to a Mac M1 machine as long as you use FlexiHub.

FlexiHub for Mac will assist you in making Mac’s USB devices accessible to a Parallels VM. And then you will just have to connect to the shared devices from your virtual machine by using FlexiHub for Windows.

FlexiHub

Requirements: Windows, macOS, Linux, Android and Raspberry Pi.
Size: 10.45MB
Version: 6.1.15025 (19 Feb, 2024)
User rating: (4.8 based on 386+ reviews)